
CrashPlan is a tool bringing much convenience for user in backing up and storing personal, commercial data for individuals and enterprises. It offers backup function both online and offline thus becomes a quite welcomed application for Mac users. Yet troubles may annoy some of you when you try to remove CrashPlan from your Mac and eventually failed, which is the reason why you come to this article. This short passage will provide available solutions for you to help you uninstall CrashPlan successfully.

Regular solution to remove CrashPlan
Regular way for application removal is more or less needed for Mac users.Through this conventional uninstall method, you will gain some basic knowledge of Mac such as caches, bundles and so on. Well, let’s get down to the earth now.
When you type your question of how to remove CrashPlan on Mac, you might find some short and simple answer on the web-page. Many warm-hearted cyber citizen may offer you a solution as bellows:
- Open Finder on your Mac and find CrashPlan
- Drag the icon of CrashPlan to the Trash or single click on the icon of CrashPlan and choose “Move to Trash“
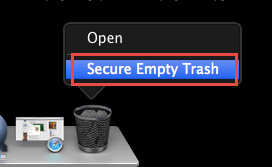
- Right click Trash on your DOCK and then click “Secure Empty Trash“
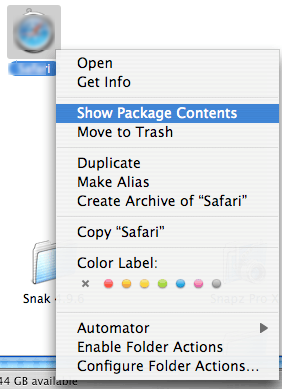
Excited as you, you will happily follow this solution thinking that it is so easy to achieve. Actually not. For Mac uninstall, what you need to remove is not only the icon you see on your DOCK or in Finder, but also other associated files and folders. Of cause, when the would-be removed application is a bundle, you can uninstall it by just dragging the icon to the Trash. Such kind of applications usually store all additional files in one folder, thus you just need to delete the icon to achieve your goal. The thing is, how can you figure out whether an application is a bundle or not? Simple! Right click the icon and click “show Package and Contents”
Except for bundles, you have to do detective work to find out all related files and folders, which are usually shown no traces in Finder, about CrashPlan. These hidden files seems small and take up little space on Mac, but in fact, their existence will slow down your Mac. With limited space for operation, you will find your Mac unfriendly. So to have a better feeling and get better service from your Mac, you need to find out all these files and folders /Library/Preferences/ and /Library/ System/Support/. All in all, you can remove CrashPlan manually by following these steps:
- Step1: Find out CrashPlan in Finder
- Step2: Drag the icon of CrashPlan and throw it into the Trash, or you can also right click the CrashPlan icon and then select “Move to Trash“

- Step3: Head for Finder, press Option key, click Go in the menu and then choose “Library” in the hold-down list.

- Step 4: Search for folder /Library/ System/ Support/ and /Library/ Preferences/ folder under Library,select all files related to CrashPlan, right click your mouse and then choose “Move to Trash“

- Step 5:Right click the icon of Trash, select “ Secure Empty Trash“
When you go through all these three steps, some may think that you have successfully removed CrashPlan on your Mac and be happy with the result. However, there are also accidents happen to some of you. Some people said that he could not uninstall CrashPlan or even could not delete the icon of CrashPlan by dragging the icon to the Trash. Or Mac always shows that you don’t have the permission to delete the application. For fear that there will be much more problems occurring such as startup problems, manual removal of CrashPlan is not recommended to you.
Recommended solution to remove CrashPlan on Mac
As it has been pointed out that problems or “side-effect” may arise when uninstalling CrashPlan manually, it is strongly recommended to get successful uninstall with a third party uninstaller—MacRemover. Besides manual removal is a time-consuming job, thus when there is a quick and safe way to remove CrashPlan effortlessly, why not have a try?
To obtain this recommended method, you have to get your own MacRemover. After the installation of your new tool, you can remove CrashPlan with simple clicks in a few minutes.
- Step 1: Launch your remover in Finder or on your DOCK

- Step 2: Highlight the icon of CrashPlan with a single click on it and then click “Run Analysis“

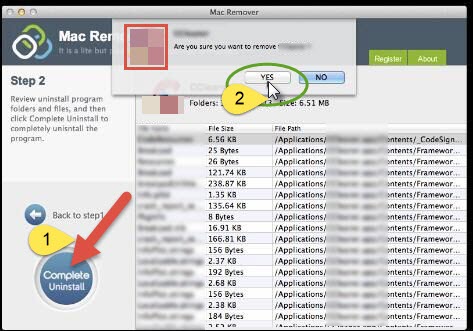
- Step 3: Wait for the result in a few seconds and the remover will scan out all relevant files, folders and plug-ins for you automatically, then you just need to move your fingers and click “Complete Uninstall” and then choose “Yes” in the pop up.
Compared with the traditional way to remove CrashPlan, removing with a smart uninstaller is a time-saving solution, which also provides safer way of removal for Mac. No matter you are a newbie Mac user or a geek on Mac, it is batter for you to adopt the latter one to get successful uninstall. Since you have installed MacRemover, it is better to keep it there and I am sure you will still need it to remove other applications in the future. In order to protect your Mac properly, you can remove unnecessary applications and get rid of all the leftovers after uninstall. What’s more, an anti-virus software like Kaspersky or Avast, or else you prefer, will be helpful to maintain your Mac.