
“Dreamweaver has encountered unexpected error”, when you tried to sage some page online, did you meet a prompt massage like that? Like many users, you might complain that Dreamweaver kept freezing on you, even when you had uninstalled it from the system. Eventually, you will need to completely uninstall Dreamweaver and come to this page, which will show you how to remove Dreamweaver thoroughly from your Mac with sequential steps.

To completely uninstall Dreamweaver, generally you need to realize three goals: to make the icon of Dreamweaver disappear from your Mac; secondly, to clean up the leftovers of it during your removal; and the final one is to empty your trash. Yet when you decide to uninstall some application, you can have different methods to adopt according to different applications.
How to uninstall a packaged application
Packaged application is the one that stores all components of it in the same folder, and is easy to remove. Once you need to remove some application,you can right click the icon of it and then select “Show Package and Content” to see whether it is a packaged application or not.
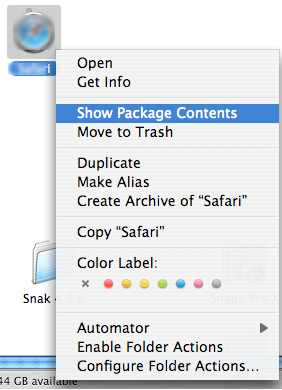
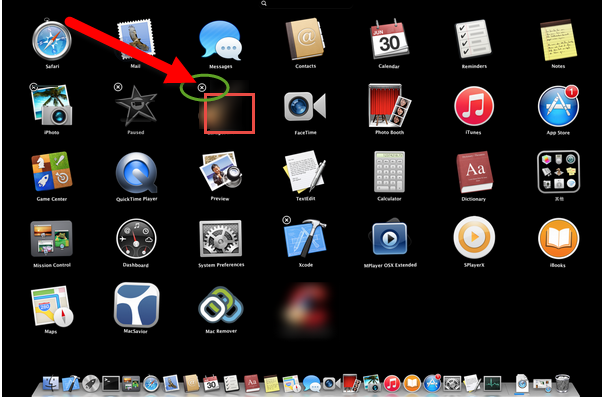
Suppose the unwanted application is a packaged one, you can just drag the icon of it to the trash, or head for your Launchpad, press and hold your mouse until the icon wiggles showing a “×”, and then click the “×” to trash it. Besides, you need to empty your trash by right click the Trash icon and select the related option.
It seems quite simple to uninstall when the would-be uninstalled application is a packaged one. However, most of applications are not packaged ones,or bundles. You need to do more work to remove it, such as what we are going to show you here, to uninstall Dreamweaver from Mac.
How to Uninstall Dreamweaver Manually
This is a traditional way that many users might have adopted to uninstall Dreamweaver. To some degree, it is similar with the way to uninstall a packaged application, yet also different from that. You need to cover more task during the manual removal of Dreamweaver other than just drag the icon to the trash and then empty the Trash.
To completely uninstall Dreamweaver, the most important part is to remove all the components of Dreamweaver from Mac, including the logs, registries, caches and other traces that may easily be ignored and take up much space of your Mac’s hard drive disk leading to a slowdown of Mac. In order to avoid such problem, you need to detect all the leftovers of Dreamweaver in three folders, i.e. /Library/Application/Support/, /Library/Preferences/, and /Library/Caches/
Here are the detailed instructions to uninstall Dreamweaver manually from Mac:
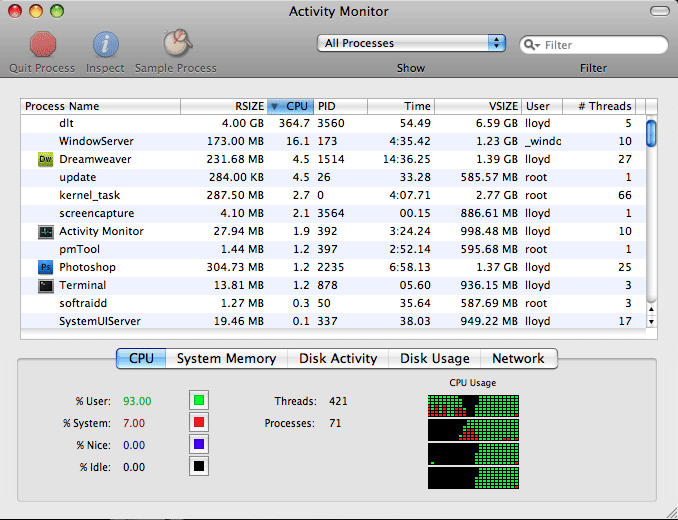
- Step 1: Quit all the processes of Dreamweaver. Head to the Activity Monitor, change the filter into “All process”,click Dreamweaver and then click “Quit Process”.
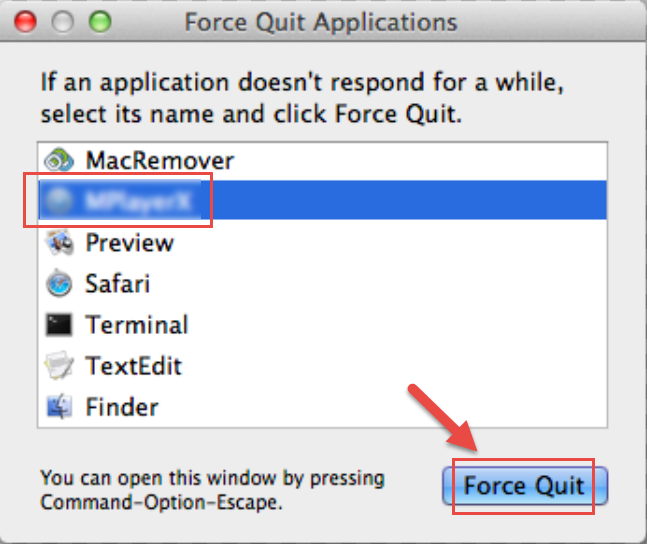
If Dreamweaver was frozen, you can also end the main process of it by the keyboard shortcuts. Press Cmd+Opt+Esc, click the icon of Dreamweaver and then click “Force Quit” to end the process of Dreamweaver.
- Step 2:Trash the main file of Dreamweaver. Go to the Applications in Finder, and then drag the Dreamweaver icon to the Trash.

- Step 3: Open Finder, go to the Library under the GO menu.

- Step 4: Detect all the related files and folders of Dreamweaver and move them all to the Trash. Search for /Library/Application/Support/, then open the folder, select all the files in it, and then delete all of them. Again, perform the same work under the Library menu, search for the folders /Library/Preferences/ and /Library/Caches/ as well, and trash all the files in those two folders respectively.


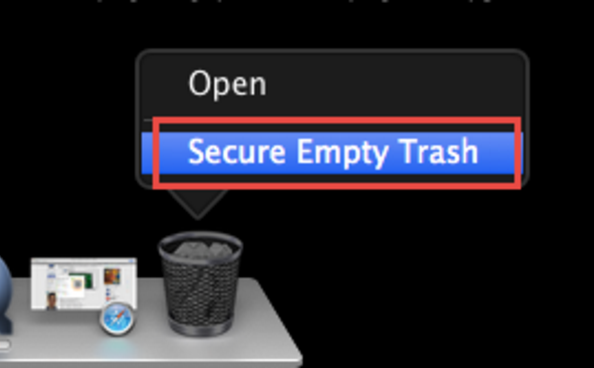
- Step 5: Clean up your Trash. Right click the Trash icon, select “Secure Empty Trash”, and then make confirmation in the pop-up box. Or alternatively, you can Ctrl+click the Trash icon and click on “Empty Trash”.
Considering the plenty time you need to perform a complete removal of Dreamweaver in a manual way, it is strongly recommended to you to adopt an automatic way to uninstall Dreamweaver, in which you can save much time and need to do less work to finish a thorough removal. Download a smart remover and have it installed on your Mac, and then you can enjoy a simple removal of Dreamweaver. The installation of the tool will cost you nothing.
How to Uninstall Dreamweaver automatically
With a smart uninstaller on your Mac, you can easily uninstall Dreamweaver from your Mac with a few clicks in seconds.
- Step 1: Launch your uninstaller, and highlight the icon of Dreamweaver with a single click

- Step 2: Click the Dreamweaver icon and then click “Run Analysis”

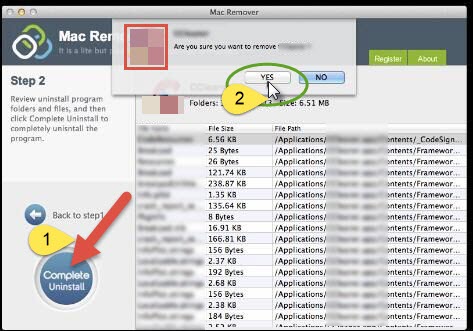
- Step 3:Click “Complete Uninstall” and click “YES” in the pop-up dialogue box to finish your work to uninstall Dreamweaver.
When you have gone through the three steps, you have finished your work to uninstall Dreamweaver completely. Different from the manual way, the detective work to search for the leftovers of Dreamweaver is done by the remover in the step called Run Analysis, thus you can save your time.
Applications uninstall on Mac is an important aspect for the maintenance of Mac, once you need to proceed any uninstall, you have to achieve a complete one to ensure a clean space for your Mac. Therefore, It is a good choice have or keep a smart remover to help you clean up all the leftovers of the removed applications.